Connecting Nodemcu to Home Assistant
In the Previous post, we had setup Home Assistant on Raspberry pi. For the first integration, we are going to use ESP8266 aka NodeMCU. Required items as follows
Requirements
- ESP8266
- Power Supply
- DHT11 Sensor
ESP8266 Setup
Our goal today is connecting NodeMCU to HomeAssistant and reading Temperature and humidity data from the DHT11 sensor. To do that we need to install small addon ESPHome from Addon store on Home Assistant. To install ESPHome Addon, go to Supervisor > Add-on Sore and search for ESPHome. Click on the Add-on and click install. Once the installation is completed, Turning on Show in sidebar and watchdog for quick access and recover the add-on in case of crash is recommended.
Now, go to ESPHome on the Left side menu. Click on the + to add a Node.
If everything went very well, you should see Living Room Node on ESPHome. Click on Edit to check the config. It should look something like bellow.

1
2
3
4
5
6
7
8
9
10
11
12
13
14
15
16
17
18
19
20
21
22
23
24
25
esphome:
  name: living_room
  platform: ESP8266
  board: nodemcuv2

wifi:
  ssid: "Wirelessname"
  password: "password"

  # Enable fallback hotspot (captive portal) in case wifi connection fails
  ap:
    ssid: "Living Room Fallback Hotspot"
    password: "password"

captive_portal:

# Enable logging
logger:

# Enable Home Assistant API
api:
  password: "password"

ota:
  password: "password"
Flashing
Now, Click on Menu and compile. After the compilation completed click on Download to save the binary. To flash the binary to the NodeMCU, Download NodeMCU Flasher. Open NodeMCU Flasher. Select COM port and binary file to flash in Config tab.
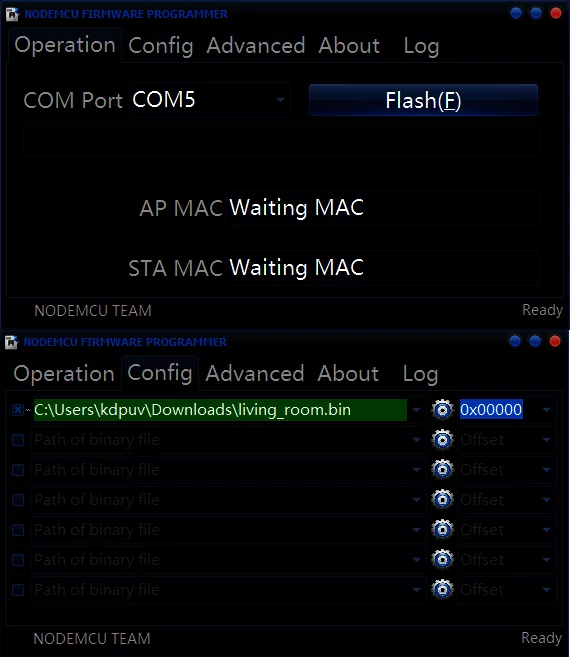
Click on Flash
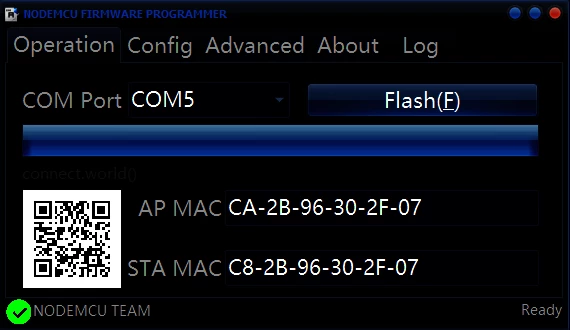
After completion of Flashing, disconnect the NodeMCU from the PC and Connect it to the Power source. Before connecting the Power source, connect DHT11 sensor to NodeMCU using following config
Wiring Sensor
| DHT11 | NodeMCU |
|---|---|
| VCC | 3V3 |
| GND | GND |
| DATA | D6 |
LED indicator of Sensor should be illuminated after connecting the power source.
Sensor Config
To Display the Temperature and Humidity, first sensor should be configured in ESPHome. Copy the following Config and add it to the living room.yaml file. (only sensor config should be added. Previous config should be changed.)
1
2
3
4
5
6
7
8
9
10
11
12
13
14
15
16
17
18
19
20
21
22
23
24
25
26
27
28
29
30
31
32
33
34
35
36
37
esphome:
  name: living_room
  platform: ESP8266
  board: nodemcuv2

# WiFi name and password for connecting to the network
wifi:
  ssid: "Wife Name"
  password: "WiFi Password"

  # Enable fallback hotspot (captive portal) in case wifi connection fails
  ap:
    ssid: "Hotspot name"
    password: "Password"

captive_portal:

# Enable logging
logger:

# Enable Home Assistant API
api:
  password: "API Password"

# OTA Updates with password protection
ota:
  password: "OTA Password"

sensor:
  - platform: dht
    pin: D6
    temperature:
      name: "Temperature"
    humidity:
      name: "Humidity"
    update_interval: 30s  # Update interval in Seconds
    model: DHT11
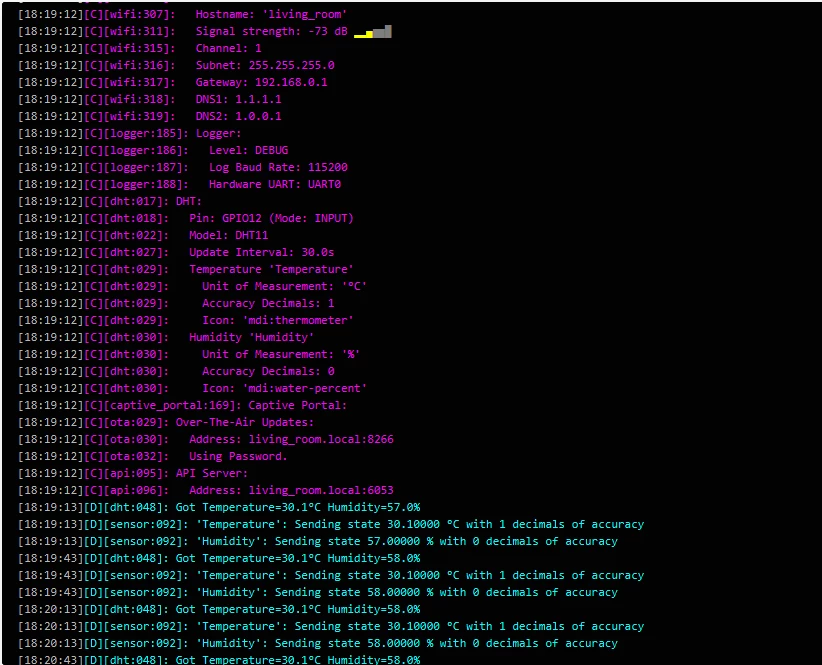
Click on Save. Upload to upload the binary via OTA Update. After validation, compilation and Uploading, ESP8266 will reboot itself and transmitting data to Home Assistant securely over APIs. Click on Log to see the data being sent from ESP8266 to the Home Assistant.
Adding Data to Lovelace
Go to Configuration > Integration, ESPHome:living_room should present there. Click on CONFIGURE and Do you want to add the ESPHome node living_room to Home Assistant? prompts, click on submit. it prompts for password, set in the config. Enter the password and Select the Room e.g Living Room
Now, go to Configuration > Entities > select Temperature (sensor.Temperature ESPHome) and Select Humidity (sensor.humidity ESPHome) > ENABLE SELECTED and yes on the prompt This will make them available in Home Assistant again if they are now disabled.
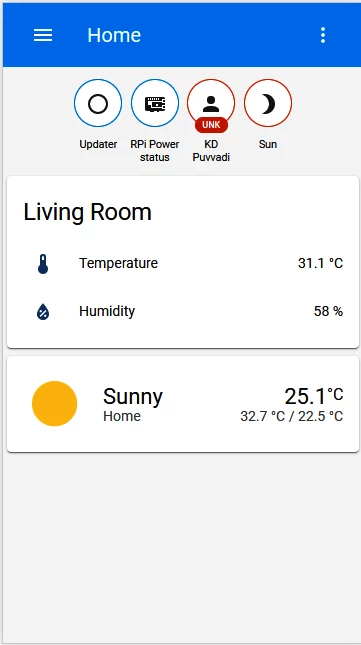
If everything went well, Temperature and Humidity should be available in Lovelace.
Conclusion
ESP8266 can be configured to work with Home Assistant is few steps and in 5 min. possibilities are limit less. Multiple Nodes can be configured. Multiple sensors can be integrated. Automation with NodeMCU can be done with simple steps. In my setup Home Assistant is controlling Air Conditioner with NodeMCU, DHT11 sensor and Broadlink RM mini 3. If the Temperature in the room reaches bellow 20, cooling will turn off and if the Temperature reaches 30 Cooling will be back on. if the Humidity is too high or too low, Humidity control will be selected as the AC function. Possibilities are limit less. Au revoir.